Wednesday, 6 March 2013

Grass Hives

Recently we have been trying to make our beehives out of many different types of materials-partially to show people some styles that they can make from materials lying around in their yard, but also just for the fun of it. Who wouldn't want a beautiful wicker beehive? Our experiment this week was with a grass hive that Agape found on the Gaia Bees website. We used Guinea Grass, which grows like crazy here, and stuffed it into a frame we had made. We then sewed it together tightly enough that it wouldn't crumble and finally attached the sides. We will eventually coat the outside with mud. This hive style is not only incredibly cheap to make (we managed to buil it entirely on scraps we found in the yard) but also will provide good insulation for the bees. We ended up only making a 2 foot box because we underestimated the amount of grass it could take. The finished product came together well though, if a little Dr. Suess-esq.
 
The 2 frames and our pile of Guinea Grass. The bottom of the frame stays on the final product and the side slats get removed. A top slat also gets attached in the threading process.


cleaning and lining up the grass to put in the frame. This just ensures that it will look neater and hold together better in the end.


Grass in the frame. You want to compact it fairly well before you begin threading it.
The completed side with the frame still attached. Notice that we also put on side boards so that we could attach it to the face.

The threading
 
The final hive with beautiful painted faces by the boys, Megan, and Agape
The grass hive ready for bees!


Sunday, 17 February 2013

Fi Wi Sinting

Today we went to Fi Wi Sinting festival at Sommerset Falls in Portland. It is a culture festival celebrating Jamaica's African roots. There was good food, good music, and even better people watching! The bus ride over was an interesting look at daily life in Jamaica (I've found that the process of getting somewhere can be almost exciting as the destination itself...). The rain eventually pushed us out early, but it was definitely worth the trip.
A Jonkunnu dancer

A rainy day at the festival....

Welcoming sign at the entrance

A festival goer throughly enjoying himself

The walk to Sommerset Falls 

The Falls! We rode in a little boat to the hidden falls through a big canyon with abnormally large trees with vines hanging off of them like snakes and leaves the size of a child.

Figures to greet us at the entrance to the festival

A man getting his portrait done at one of the booths

Drummers

Dirty feet and an afternoon snack-signs of a perfect day!

Thursday, 14 February 2013

Brown's Town Bee Training and Langstroth to Top Bar Transfer

On Tuesday we travelled to Brown's town in St. Ann for a top bar training. The training was hosted at the local community college, and it was interesting to see the similarities and differences between my college experience and the Jamaican one. Megan's presentation went really well and at the end we got to transfer comb from their Langstroth hive to the Top Bar hive that we donated to them! This was the first time I had actually seen a hive transfer which was really cool. Then we went to the Brown's town fruit market which was much quieter than the Kingston market but still exciting-it's always fun to get to see piles of new and delicious tropical fruits!


Brown's Town Community College


Megan demonstrating how to extract honey
 
Top Bar comb savers
 
Cutting the comb from the Langstroth hive into the Top Bar comb saver. You tie the comb into the comb saver with string or rubber bands and soon the bees will attach the comb to the frame.

The donated Top Bar hive with its new colony!


Saturday, 9 February 2013

Top Bar Beekeeping Trainings Around the Island

We have a beekeeper staying with us for a month sent by USAID named Megan. We have been travelling all over the island doing introductions to top bar hives with her. These trainings have been a lot of fun because we get to meet enthusiastic people with all different levels of experience and from different places many of whom know little about top bars. It also gives us an opportunity to see different parts of the island (it varies a lot in terrain and feel of the cities-especially in very tourist centered areas). Being around all these excited new beekeepers is getting me ready to start up my own hives once I get back!
Doing hive inspections at Yerba Buena with the Jamaica Organic Agriculture Movement (JOAM). Most of the people in this group were new to beekeeping.
 
Our newly built top bar hive at the St. James beekeepers meeting (by Montego Bay)

Megan lecturing at the St. Catherine in the Ministry of Plants and Fisheries-Apiculture Unit. This was the largest meeting so far (around 50 people) with mostly people who already had some bees.


Giving the Trelawny beekeepers their new top bar hive. Trelawny is where Usain Bolt is from, but despite my Bolt-dar I didn't see him on this trip....next time.

Jerk chicken and rice with beans on the way to St. James

A rugby match to go with our roadside lunch en route to St. James

Tuesday, 5 February 2013

I've got a lovely bunch of coconuts....


Big ones, little ones, some as big as your head! We went coconut hunting on the family's other farm up the hill in Islington. It was fun getting to actually collect the food we would be eating. The farm is like something out of Jurassic Park, I kept expecting T-Rex to come barging through the chest tall grass. We ended up collecting 1 and a half bags worth of coconuts, which gave us enough to have tons of drops, porridge, and curried lentils with some still left over to share!

A coconut tree
Kwao splitting the outer layer to get to the hard coconut seed (what you would buy at the store)

A branch with coconuts. You know that the inside will be good if you can shake it and hear water sloshing around inside.

A Kapok tree


A crocus bag filled with coconuts


The boys riding with our coconut stash in the back

Drops! shredded coconut in carmelized honey with ginger on a banana leaf

Thursday, 24 January 2013

Oven Building

Yesterday we finished rebuilding the Cobb oven that we have been working on for about 2 weeks. The brick foundation was already there from the last oven (that was broken during the hurricane) so we had to add the clay dome, the insulation and the final plaster. It was a fun project that allowed everyone to get covered in mud and then have a delicious baked treat to reward ourselves with in the end! Cobb ovens are also really cool beacause they cost nothing to power (assuming that you have readily available firewood...) and they retain their heat for about 6 hours. This makes them a good tool for developing economies because they are cheap to make (all of the materials we used came from their yard), easy to maintain, very eco friendly, and practical for cooking.
The brick archway and the sandform that we used as a mold for our first layer of material. Once this layer was dry we dug out the sand and had a beautiful clay dome!
Collecting clay to use for the first layer

The boys and I mixing up the first layer of material-a mixture of finely sifted sand and clay in a 3:1 ratio. It was hard work and involved dancing while reggae music played in the background to help cover up the burning in my legs and my incredibly terrible coordination...

The first layer going on over the newspaper covered sand form. The newspaper was useful when we had to dig the sand out so that we knew when to stop. This layer was about 4 inches thick the whole way around and will hold the majority of the heat from the fire.

Suzy being useful...


Mixing up the secong layer, which is a mixture of mostly sawdust and just enough clay slip to make it stick. This will be the insulation layer.

Agape making clay slip for the insulation mixture
The finished insulation layer, about 4 inches thick. This layer should be light and springy while it is still wet, and when in doubt opt for less sawdust than you think you need.

 
Our first fire in the cobb oven (We jumped the gun a bit and did it before we finished to insulation but we just couldn't wait for fresh bread)! If you light a good blazing fire and let it burn for 2-3 hours, your oven will stay hot enough to cook in for up to 6 hours. It is helpful to have a door to keep the heat in. Ours is covered in tin to keep the wooden door from burning.


We had some help finishing the oven from the wedding party staying next door! It was a good group project and a fun way to get to know some new people. The final layer was about an inch thick and made from a mixture of .5 parts horse manure, 1 part clay, 3 parts sand.

Agape, Joshua, Enoch, and Kofi putting shells collected on their beach for the finishing touches on the new oven

Finished cobb oven!

Our first coconut cake made in the new oven! delicious!

Tuesday, 22 January 2013

Hike to the waterfall and Black Sand Beach

 
Today I joined a wedding tourist group on their hike to the waterfall and Black Sand Beach. It was a beautiful trip and I got to see a part of the island that I hadn't been to before. The area used to be a little town, but once they realized that it was too far to route electricity everyone (including the first residents of Yerba Buena) moved up to Strawberry Fields, so there were some cool old buildings covered in ivy and fig trees. We hiked in and then got a boat ride back, which was beautiful! A lovely day overall of hiking and swimming and getting a little burned in the sun....
 
A little cove we spotted on the hike in
 
Old church

A fig tree attacking the church

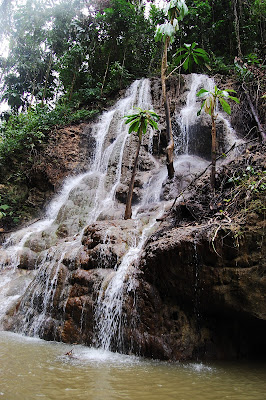
The waterfall!
Black Sand Beach


The boat ride back